Whilst visiting I also acquired the Hose-kit and overflow header tank so basically everything needed to connect the cooling system together between radiator, engine and overflow.
 First task is fitting the thermostat housing elbow which is a simple bolt onto the engine job, however it is extremely important the external surfaces are flat and smooth to avoid pressure loss and leaks. This was achieved using some sandpaper and rubbing the elbow on a flat surface to remove the powder coat and achieve a smooth flat finish.
A gasket also fits between the housing and engine block which was held in place with a dab of gasket seal.
This is then all bolted to the engine with three bolts...however on reflection i would recommend this is fitted BEFORE the engine is installed, getting to a couple of the bolts with the engine installed whilst not impossible does require some spanner dexterity plus the distributor will need loosening and moving away in order to get the top right hand bolt in:
So with the elbow secured to the engine, I added the alloy thermostat housing onto the top, again using a gasket as a seal between to the two parts, two Allen bolts hold the housing place, followed by the thermostat and cap - all straight forward.
Next, the water rail is fixed to the side of the engine. Before that can be done, you will need to remove some surplus to requirements heat shield from the engine block, this will expose some holes which the water rail bolts through:
Like the other parts, the water rail is held in with a couple of hex head bolts and washers, again all straightforward.
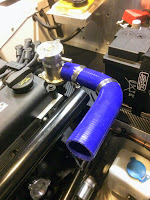
Last piece of the water rail jigsaw is fitting the 90 deg blue pipe to connect the thermostat to the water rail - as you can see from the the pictures this will need cutting to size which is a simple task using a very sharp knife (see my next post on a dead easy way to achieve a clean cut). Once cut to size its all held in place with jubilee clips.
So part one done - next step is to fit the "plumbing" between the water rail and engine.


No comments:
Post a Comment