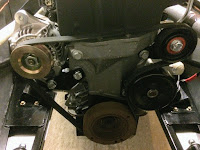
GBS do a nice kit with all the parts needed to fit the alternator, all to the very usual high standard of manufacture although it did prove to be a bit of jigsaw to work out what goes where when you open the box up!
I spent approx half an hour sorting out out all the bits and working out what goes with what and where each bracket fits to the engine and cross referencing other builds as a guide, hopefully the photos show what goes where...
I also took off the powder coat on the alternator brackets where the alternator mounts into the brackets in order to provide a solid earthing point
Once the components have been identified its a simple case of bolting to the engine.

 There is no right or wrong way to fitment however I fitted the top alternator brackets first (will need the engine lifting lug removing) followed by the bottom bracket, which includes a spacer bracket which goes between the engine and bracket. (Note the lower bracket utilizes an existing bolt mounting point on the engine).
 The final bracket to fit is the tensioner pulley bracket which again uses an existing bolt/mounting point on the engine block, together with a spacer for the side mounting position.
The tensioner pulley was also fitted at this stage and kept slack ready to take the belt.
mounting the alternator onto the upper/lower brackets and taking a straight edger between the alternator pulley and the tensioner pulley to check the belt will run square, several space washers were need on the lower bracket to get the two pulleys square with one another.
All good, the final fit is the belt which is held in position by adjusting the tensioner pulley to apply sufficient tension to the belt to prevent it slipping and coming off.
Overall a relatively quick job. Main time is spent working out where the various bits go!


No comments:
Post a Comment