Wednesday 30 August 2017

Engine install, tidy up

Back in the garage Wednesday evening.

took the opportunity to check the centralization of the engine in the chassis , all good:


I also removed the thermostat housing in readiness for the GBS water rail kit. In hindsight I would recommend you remove this BEFORE the engine goes in. It is held on by three bolts of which the bottom one, is dead level with a cross member on the scuttle. There is just enough room to loosen this bolt and for the thermostat housing to come away, so not a big showstopper by any means but on reflection, easier to do before the engine is dropped into the chassis

I also checked the bellhousing against the transmission tunnel - you do need to ensure some of the bellhousing is cut away before dropping the engine/gearbox in. Although the picture does not show this too well, thankfully I had judged how much to cut away late last year and there is enough space for it not to snag  (picture below middle right shows the cutting which has to be made)


I have not yet, drilled and bolted the engine mounts into chassis as there may still need to be some slight adjustment left/right depending how ancillaries are fitted and routed in the engine bay. It is not moving anywhere fast and is solid in the chassis so I am happy to leave it for the interim. Once I have get better comfort on the ancillaries i'll get it drilled and bolted.

The radiator, steering column and oil dipstick were also put back in place.

Some pictures of the installation as it currently stands:


Sunday 27 August 2017

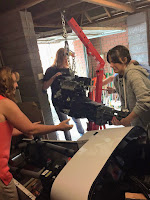
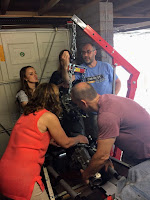
Engine is in!

I used the Sunday of the August bank holiday weekend to get the engine installed into the chassis. So cry for help went out across South Manchester with the bribery of bacon rolls, sausage rolls, tea, coffee on offer to willing attendees!

A good turn out of family to which I am eternally grateful to and I will give a shout out at the end of this post. Photos were provided by my Niece Jessica and I hope they encapsulate the team effort on the day.

Before the engine, gearbox was dropped in on the Saturday morning prior I had fixed the correct engine starter onto the bellhousing. All straight forward, three bolts hold it in although the bottom bolt near the sump can only be tightened when the engine is in position in the chassis and you can get underneath the car to access the bolt.

Although I had prepp'd the engine bay with padding earlier in the month, I took the opportunity to also remove the front radiator, steering column and move away loose wires on the wiring loom to avoid any potential damage.  

Time to take a deep breath, stand back, go have a cup of tea, have a think, have a read and work out the approach to take in dropping the engine in.

So the approach I had mapped in my head was:

  1. Install from the drivers side
  2. Winch up the engine/gearbox
  3. Guide it round and over the engine bay (from the drivers side)
  4. Tilt it and drop it into the chassis, 
  5. Push the draft shaft into the gear box and locate on the gearbox mount
  6. Fix on the engine mounts
  7. Centralise left and right on the centre line
  8. Drop down onto the engine mounts which sit on plates welding into the chassis.

Simple eh!

Before all that could be done, we had to re-locate the whole chassis further back into the garage which entailed lifting the rear with the engine hoist and using heavy labour on the front to shuffle the chassis back to enable better access to the engine bay.

I also elected to stand the front of the chassis on one axle stand centrally located to allow for better access by the engine hoist and it not to snag on two axle stands.

Once all that was done, time to apply the approach detailed above...

Too be honest, it worked as described, the challenges were:

  • Guiding the engine up and over the chassis and controlling the drop on the hoist gently enough to not bash the chassis and drop the engine too rapidly - plenty of helpers to guide the engine over and judge the rate of drop  
  • Getting enough tilt and forward movement on the engine to point it down and under the scuttle, I cannot recommended enough that you invest in an engine tilt / loader leveler, this will help no end in getting the gearbox pointing down sufficiently, then use some muscle to push it under the scuttle into the transmission tunnel.
  • Use a trolley jack underneath to support the gearbox at a level which allows for the driveshaft to push on cleanly and level. It is then a case of jiggling, pushing the engine, gearbox onto the driveshaft and locating the gearbox into the rubber mount whilst controlling the drop on the hoist. It was hard to see if the gearbox had located into the mount and too be honest it was more a case of feeling with fingers to establish it had located successfully.
  • Once the engine/gearbox has successfully located onto the driveshaft and it is still supported by the hoist, fix on the engine mounts and tighten to the engine, then while judging the centre line / centre of pulley are lined up, drop the engine down on its mounts onto the the chassis plates.

Overall i would guestimate it took around an hour to complete start to finish. It went way better than I expected and feel this is huge milestone in the project finally getting the engine into the chassis
 

With grateful thanks to (in no particular order):

Sue, Alice, Neil, Vicki, Jess, Becky, Alex  - what a team :-)

Sunday 6 August 2017

Bits N Bobs engine and gearbox prep

Grabbed a quick couple of hours in garage yesterday.

First job, fill the gearbox with oil. 1 litre of SX75W-90 GL-4 semi synthetic gear oil fed into the gearbox.

I was going to fit the starter motor, however hit a snag with that one. Purchased the Lucas LRS707 after extensive research only to discover the pinion on the motor does not meet the flywheel on the engine. So more research and it now transpires I need a Lucas LRS543 (or equivalent) when mating a 2.0 Zetec to type 9 gearbox...

need to put call into Direct Auto Electrical in Manchester to a) see if they have the LRS543 and b) will they exchange for the LRS707 I bought not so long ago.

This is one of the frustrations where some basic clear and concise guidance would be appreciated, just saves aggravation in the long run and adds a further delay...

So, with that idea parked, I turned to the engine bay and got that prep'd ready to accept the engine. Foam padding round the exposed powder coating which might get bashed with lowering the engine in, some paper put on the engine mount points to allow for the holes to be marked/drilled and moved some exposed wiring harness out of the way which may get caught with the installation.

I also marked a centre line on the lower cross frame to act as a datum/centre line when lining up the engine in the chassis.


Wednesday 2 August 2017

Gearbox to Engine

I think we are ready to mate the gearbox to the engine...

Feel this is a bit of landmark as the I edge ever closer to the day of installing the engine into the chassis.

Just a case of manhandling the gearbox to the engine and easing it into position. 

The new ATR lowered sump provides a level surface for the engine to sit stable on the floor, so in terms of additional packing under the engine and gearbox to get everything level, very little is needed apart from some blocks of wood under the gearbox mounting point.


The gearbox is fixed into position with 5 bolts and tightening them in pulls the bellhousing closer to the engine. As per Haynes manual torqued to 45lbs

One thing I need to check is the clutch release lever/clutch bearing. I'm not too sure how slack, loose, tight this should be - gut feel moving the clutch release lever it feels too loose, need to do some reading up on this to understand what i should be looking for. <update, all good! realised pulling it wrong way, rookie error, Doh!> 


Gearbox to Engine Dowels

2 Dowels / collars need fitting to the engine at 3 O'Clock and 9 O'clock positions looking directly at the engine.

Simply knock into the existing holes.

Not wishing to damage the dowels, I used a file with a penny washer which acted as a useful guide to ensure the dowel was knocked in even and level.


I few knocks with the trusty hammer and the dowels are in position, clearly there is a "natural" stop" for the dowels in the engine block as two / three good taps with the hammer and they will not go any further in.