Nice quick job and one which is best done before the fuel tank and rear panel are fitted.
The diff requires approx 0.9ltr of oil (source: Haynes Sierra Manual)
Oil grade used:
Semi Synthetic gear and Diff oil SAE 75/90 courtesy of Halfords (other makes and brands available!)
Once filled tightened the fill nut to 35nm - checked for obvious leaks - so far so good!
Saturday, 23 April 2016
Fuel Filler Cap
Another nice quick job (like those sort of jobs!)
I purchased the ATR filler cap from GBS which is IVA compliant so at least I knew it would have no issue passing the test come the time I need to get it registered and on the road.
Although pricey for what is essentially a filler cap it is beautifully machined and comes with the fixings need to apply to the rear panel and two spare keys
 The hole for the cap is already pre-drilled in the panel so its just simply a case of positioning in the panel, marking where the screw holes need to be made and carefully drilling those holes through the panel.
The filler cap in turn has a gasket which needs to go on over the filler cap and then its simply a case of screwing the cap to the chassis.
I purchased the ATR filler cap from GBS which is IVA compliant so at least I knew it would have no issue passing the test come the time I need to get it registered and on the road.
Although pricey for what is essentially a filler cap it is beautifully machined and comes with the fixings need to apply to the rear panel and two spare keys
 The hole for the cap is already pre-drilled in the panel so its just simply a case of positioning in the panel, marking where the screw holes need to be made and carefully drilling those holes through the panel.
 The filler cap in turn has a gasket which needs to go on over the filler cap and then its simply a case of screwing the cap to the chassis.
Sunday, 17 April 2016
Rear Brake calipers
With the refurbished driveshafts now installed back into the chassis I can turn my attention to fitting the rear brake calipers.
I have elected to run with discs all round the vehicle so although the sierra donor was drum braked on the rear, converting to discs is a straightforward option.

You will need to order some rear caliper mounting brackets from GBS which fit to between the hub carrier and rear uprights. These in turn support the brake calipers via x2 M10 bolts (approx 40mm)
Brake calipers....this was a frustrating delay more through my own lack of knowledge on Sierra calipers and general guidance out on the web.
What you will need are Sierra Cosworth 4x4 brake calipers NOT Sierra Cosworth brake calipers - spot the subtle difference...yep "4x4" it does make a difference believe it or not. The standard rear discs are 22mm thick, these are too thick for the standard sierra cosworth calipers, which I discovered much to my annoyance when I came to fit! grrgghh
 So what was initially a two week lead time on the calipers turned into a four week lead time by the time I had returned the incorrect ones and the supplier had sourced the correct set.
I must mention at this point the service provided by Biggred - they provided an excellent service, the quality of parts I got from them were first class and are well worth checking out both on their ebay shop and company website.
So once received, its a simple case of fitting the disc onto the hubs which in turn is secured with a wheel nut. Marry the caliper to the mounting brackets (you will have to file the carriers and remove the powder coat as the disc will foul in the caliper otherwise)
Once that is done, you can connect the brake cable to the caliper, via simple hook and eye connection and screw in the brake line, job done!
I have elected to run with discs all round the vehicle so although the sierra donor was drum braked on the rear, converting to discs is a straightforward option.

You will need to order some rear caliper mounting brackets from GBS which fit to between the hub carrier and rear uprights. These in turn support the brake calipers via x2 M10 bolts (approx 40mm)
Brake calipers....this was a frustrating delay more through my own lack of knowledge on Sierra calipers and general guidance out on the web.
What you will need are Sierra Cosworth 4x4 brake calipers NOT Sierra Cosworth brake calipers - spot the subtle difference...yep "4x4" it does make a difference believe it or not. The standard rear discs are 22mm thick, these are too thick for the standard sierra cosworth calipers, which I discovered much to my annoyance when I came to fit! grrgghh
 So what was initially a two week lead time on the calipers turned into a four week lead time by the time I had returned the incorrect ones and the supplier had sourced the correct set.
I must mention at this point the service provided by Biggred - they provided an excellent service, the quality of parts I got from them were first class and are well worth checking out both on their ebay shop and company website.
So once received, its a simple case of fitting the disc onto the hubs which in turn is secured with a wheel nut. Marry the caliper to the mounting brackets (you will have to file the carriers and remove the powder coat as the disc will foul in the caliper otherwise)
Once that is done, you can connect the brake cable to the caliper, via simple hook and eye connection and screw in the brake line, job done!
Saturday, 9 April 2016
Rear Panel - Part 1
Well, the time has come... I have to bite the bullet and give consideration to fitting what most builders consider the hardest piece of the zero build - forming and fitting the rear panel.
It looks daunting when you see the single largest piece of steel flat on the floor and I profess to have spent alot of time reading fellow build blogs, studying photos and basically building up the courage to jump in and get the panel formed.
After reading the various blogs and techniques I also asked the factory how they did it more to confirm some understanding but I guess to see if they had any secret alchemy they used to create this major panel.
Truth be told.. the GBS way of of construction was what I ultimately followed and I will share with you below the technique they used.
So one Saturday set aside with no distractions, plenty of space time to build a rear panel:
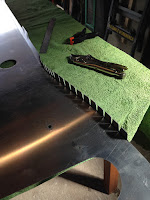
- I covered the patio table with some old carpet/towels and sat the rear panel onto the table top - back down. the panel is quite weak so make sure it is evenly supported.
- First thing, do not try and roll the side at this point, you need to do some prep work before some bends are put into the panel.
- The tabs along the top edge and sides of the under section need bending 90deg, the top edge toward the front of the car, the under section upward. Precision doing this will help later. bend from the bottom of the slots.
- locate the hole in the last under section tab, and make sure you have an appropriate bolt to fit, the hole is roughly cut at 6mm and will need filing out. Locate the corresponding hole in the outer wings, (the bits that will come around to form the sides, and do the same as above).
- now, without trying to roll anything, bring the two holes together on each side and nut and bolt.
- The rough rear panel shape is now formed.
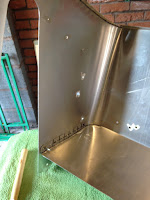
- keeping the the under section straight, a straight edge and marker line is a good idea, starting with the tab you have just bolted, push the sides and tab together drill and rivet. This is quite challenging if you are on your own so a spare pair of hands is useful!
- continue down the under panel both sides until all BUT the last tab are secured, do not drill this it will be visible - its not covered by the wing.
- the rear panel should now sit on the under section
- now the top panel hoop, which is even more flimsy than the rear panel - be careful with this piece it is visible so any kinks/damage will be seen
- find the centre of the rear panel and the hoop, position rear and hoop together with bolts.
- align the hoop to rear panel matching the center marks so that rear panel is slightly proud of the hoop
- clamp the parts together at each point you drill and and secure with Cleco's, continue across the rear.
- manipulate the sides so that the side radius matches the hoop radius, again the sides should be slightly proud of the hoop. Again a spare pair of hands is useful otherwise use some quick clamps to hold in position whilst you drill and Cleco
Doing the above will form the panel - as the pictures below I hope prove..
The whole process should not be rushed and I spent a good part of the day doing this task - overall pleased with the result and compared to the scuttle on reflection, I think the rear panel is easier to do - the instructions from GBS were spot on and I would recommend this method over other methods which fellow builders have adopted - each to their own, they have all achieved an end result.


Subscribe to:
Comments (Atom)


